4a – Getting Ready To Drive
TRAINING QUIZZES AND EXAM QUESTIONS ARE RELATED TO WRITTEN TEXT ONLY
PLEASE READ YOUR TOPICS
Videos are only here for educational purposesm but also to help fill up the gap with each topic’s minimum learning time. Also some Videos concern national laws in general, not specifically related to Nevada laws, refer to written content when in doubt.
From this lesson, training quizzes request 100 percent accurate responses.
Records show that many students still chose to scroll down the pages to wait by the timer and guess quiz’s answers
THIS IS NOT THE PROPER WAY TO DO THIS COURSE. BE RESPONSIBLE GUESSING CONFUSES THE BRAIN
PLEASE READ YOUR TOPICS!
4a – GETTING READY TO DRIVE
Know how to Handle a Deadly Weapon: your Car:

- What do a trained Monkey and a wise & safe driver have in common?
– They both know how to turn a steering wheel. - What is the difference between a trained Monkey and a wise/safe driver?
– Wisdom – A wise driver knows the rules and respects them. - What is the definition of wisdom?
– Wisdom is the ability to think and act using knowledge, experience, awareness, understanding, common sense, and insight.
4 – How do we acquire wisdom?
– By acting like a responsible adult and reading all topics for proper training. (especially lessons 4, 5, and 6)
Driving means freedom but for teens, it also means they are now considered as adults in charge of a deadly weapon.
A wise driver is aware of the danger, knows rules and regulations, and respects them! Simply turning a Steering wheel is not driving.
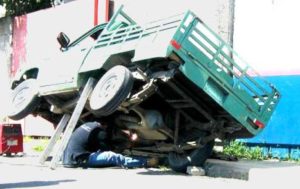
Approaching / Checking the Vehicle
- Check around the outside of the vehicle. Look for small children playing in front or behind the car, pets, and any other sort of obstruction. Check the condition of the vehicle (windows, lights, body damage, the condition of the tires, and fluid leaks).
- Before opening the driver’s door make sure no car is coming. Enter and close the door immediately.
- Place the key in the ignition and lock the doors. Verify that the current certificate of registration and evidence of insurance cards are in the vehicle if you are not sure of this.
Entering the Vehicle
Be careful when opening the door if it is close to traffic.
You are now sitting in the driver’s seat. You are in charge.
If it is your first time, you must be very excited, maybe a little nervous…Don’t be. If you know all the rules and regulations (and this is what this Driver’s Ed is all about), and if you respect the laws and stay constantly aware and VIGILANT, you and your passengers will be safe.
Being vigilant is carefully noticing problems or signs of danger, and we will teach you how in this course. First, the checklist:
IMPORTANT: Your car should be in “park” as it is the only way to stop the engine. Verify that your Parking Brake is engaged.
A DMV examiner will look for this before you even start your engine during your DMV Driving Skills Test.
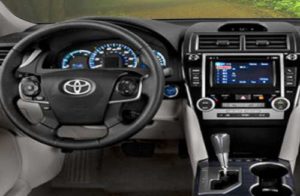
Identify the location and purpose of ALL switches, gauges, pedals, horn, and warning lights.
Know the location of the following controls even if you are not planning to use them at the moment:
THE DMV INSPECTOR WILL ASK YOU FOR THOSE BEFORE DEPARTURE.
- Horn,
- Turn signals,
- 4-Way flashers,
- Headlights,
- Windshield wiper switch,
- Parking brake and release lever,
- Air conditioner/heater/defroster.
Make Sure You Have Full Visibility

Your windshield should be clean and unobstructed. Be aware of objects or documents on the dashboard or front seat that may fly over when driving, disrupting your attention. Place them in the back seat or glove compartment. Secure your cargo and make sure you have full visibility all around. Heavy objects may fly to the front in case of strong and sudden braking. If you have a pet make sure he is securely attached and not wandering around. Avoid all distractions while driving.
ADVANTAGE of an obstructed windshield
If you are involved in an accident, you won’t see it coming!
Adjust All Devices to Your Size and Position
- Adjust your seat and, if equipped, the steering column.
Your body should be about 10 inches back from the steering wheel with or without an airbag.
- Your foot should be able to pivot smoothly from accelerator to brake while the heel is kept on the floor. The top of the steering wheel should be no higher than the top of the shoulders.
- Adjust seat head restraints to a level even with the back of the head.
- Adjust the inside mirror so that it frames the rear window.
- Outside mirrors should be adjusted to reduce blind spots and provide maximum visibility. Seated in an upright position, you should lean your head to the left about five inches and adjust the left mirror so that the rear fender is just visible on the right edge of the mirror about a half-inch up from the bottom. To adjust the right mirror, lean your head to the right about five inches, and adjust the mirror so that the rear fender is just visible on the left edge of the mirror about a half-inch up from the bottom. When seated in an upright position, you will not see the sides of the vehicle in the mirrors.
- Fasten and adjust safety belts. Make sure passengers are properly belted. Lap belts should be positioned firmly across your hips while the shoulder belt is firm across your shoulder.
- Do not forget to release the parking brake. It is either a handbrake (under your right arm) or on the floor under the left foot (that is the only time you need your left foot on an automatic transmission).
Never use your left foot on the main brake and your right foot on the gas, because in an emergency, the tension of the moment may cause confusion and you could end up pressing on both the brake and the gas at the same time, or push the wrong pedal… very Dangerous indeed! When you have the habit of using only the right foot for the brake and the gas, then you will only press one or the other of those pedals in an emergency, but never both at the same time. Your left foot should only be used for the parking brake or for the clutch if you have a manual transmission.


BUCKLE UP! It’s the Law

Seat belts are your best protection against injury or death if you are in a vehicle crash. In 2005, more than 25/100 highway fatalities in Nevada were people who were NOT wearing their seat belts. This is a 17/100 reduction from 2002 statistics.
In Nevada, seat belts aren’t just a good idea – They are the law.
Who is Required to Wear a Seat Belt in Nevada?
Essentially, the State of Nevada wants every driver and passenger to wear a seat belt:
- DRIVERS AND PASSENGERS 6 years of age or older weigh over 60 pounds.
- Children 6 to 12 years of age that weigh over 60 pounds must be belted and riding in a rear seat. Be aware that people who do not have children of their own but are transporting children may not be aware of this law. It is every parent’s/guardian’s duty to tell the driver of their children the proper procedures.
EXCEPTIONS:
Children, less than 6 years of age or less than 60 pounds must be restrained in a proper car or booster seat.
- Mothers-in-Law? NO! (sorry) – unless for reason based on medical necessity. See below:
- Anyone having a condition in which a seat belt or safety restraint would likely cause more harm than good can be exempt from the seat belt law.
Actually, in some cases, This may reduce the risk of accidents. Annoying arguments with passengers may cause a fatal distraction. Driving in a quiet environment helps with concentration!
– Kids Aren’t Cargo! Passengers under 18 may not ride in the back of a pickup or flatbed truck.
This does not apply, however, to farming and ranching activity, parades or to camper shells or slide-in campers.
Pregnant Women
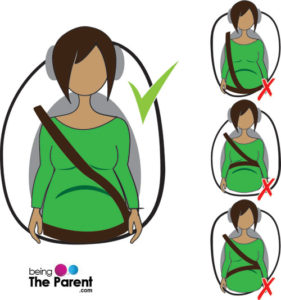
Pregnant women are strongly urged to keep the lap belt positioned below the belly/abdomen area at all times to avoid serious injury to their unborn child in the event an accident does occur.
The combination of safety belts and airbags offers the best level of protection to pregnant women, as long as they follow the same advice as to other adults: ensure they are properly belted, maintain a proper seating position, and move the seat as far back as possible.
The lap belt should be positioned low on the abdomen, below the fetus, with the shoulder belt worn normally. When crashes occur, the fetus can be injured by striking the lower rim of the steering wheel or from crash forces concentrated in the area where a seat belt crosses the mother’s abdomen. The seat belt will keep a pregnant woman as far as possible from the steering wheel. The airbag will help spread out the crash forces that would otherwise be concentrated by the seat belt.
Women late in pregnancy may not be able to get their abdomens away from the steering wheel. If the vehicle has a tilted steering wheel, pregnant women should make sure the steering wheel is tilted toward the breastbone, not the abdomen or the head.
Seat belt safety tips during pregnancy
- The safest type of seat belt to wear is a lap and shoulder belt combination.
- The lap belt should be placed below your belly, touching your thighs, and low and snug on your hip bones.
- Never wear the belt above or across your belly.
- Always use the shoulder belt which should fit snugly across the center of your shoulder and chest.
- Never place the shoulder belt under your arm or behind your back.
- If you are driving, make sure you keep your belly a safe distance away from the airbag. Your breast bone should be at least 10 inches away from the dashboard or steering wheel. You may have to move your seat back as your belly grows!
CHILD SEAT LAW
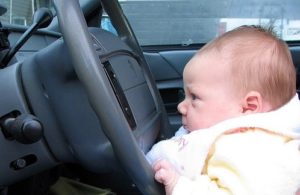
Never leave a child age 7 or younger unattended in a vehicle
if the conditions present a significant risk to the health and safety of that child,
unless the child is being supervised by and is within sight of a person at least 12 years old.
Child Car-seat Checklist
Never use just a lap belt across a child sitting in a booster seat designed for shoulder belts.
Follow this easy-to-use checklist when buying a new child safety seat:

- The seat you have selected can be used rear-facing.
- The seat meets the federal motor vehicle safety standard. This information can be found on a sticker on the side of the car seat.
- Your child’s height and weight fit the height and weight limits listed on a label on the side of the car seat.
- The harness is easy for you to adjust each time you put your baby in and out of the seat.
- The seat is easy to install in your car.
- If you have more than one car and are buying an infant carrier with a base, you can buy a base for each car.
If you are buying a used child safety seat, you also have to check the following:
- The history of the child safety seat; make sure it was never involved in a crash.
- The seat has not been recalled. Visit the National Highway Traffic Safety Administration to recall information.
- The seat is not too old. Most manufacturers place an expiration date on their child safety seats, which is normally around six years.

- Never use pillows, books, or towels to boost a child. They can slide around and hit the occupant.
- Never put a shoulder belt on anyone’s arm or back because it eliminates the protection for the upper part of the body and increases the risk of severe injury in a crash.
If your car is a 1968 model or newer, it must have lap-type seat belts for passengers in the front seat. - If it is a 1970 model or newer, it must have lap-type seat belts for each passenger of the vehicle. It must also have shoulder harnesses for use in the front seat.
- Never hold a child on your lap or buckle yourself and a child into a single safety belt, and never buckle two children into a single safety belt.
Nvada Laws have changed for resr facing car seats
Keep children in the back seat until at least age 12.
Select a car seat based on your child’s age and size and use it every time.
1 month to 2 years –
Use a rear-facing car seat through age 2 and until your baby reaches the seat manufacturer’s height and weight limits.
Age: Newborn to 2 years
Height: Less than 57 inches
Weight: 60 pounds or less
Penalty: $100-$500 or 10-50 hours community service for a first time; $500-$1000 or 50-100 hours community service for a second time; suspension of driver’s license for 30-180 days for a repeat violation
1 – 3 Years – best practice
Keep your child rear-facing as long as possible. Then use a forward-facing toddler seat with a harness until your toddler outgrows that seat’s limits.
6 – 7 Years –
Once your child has outgrown the seat with a harness, ( over 60 lb) use a booster seat until he or she is big enough for seat belts. Stay in the back seat
.
8 – 12 Years –
Use safety belts once they fit properly. The lap belt should lie across the thighs, not the stomach. The shoulder belt should not cross the neck or face.6
REMEMBER:
In a crash, a person’s body weight is multiplied by the speed of the car. At 50 mph a 100 lb passenger without a seat belt will fly forward through the windshield and will hit whatever is in front with a force of 5,000 pounds. It is humanly impossible to brace against such a force. You will be thrown out of the car like a rag doll and will be very seriously injured.
New technology has seriously evolved regarding security in cars during accidents. Cars disintegrate on impact but it is meant to do this to absorb the shock. It is actually safe!
The cabin is a safe bubble and stays usually intact. Wearing your seat belt will ensure you stay securely attached inside this safe zone.
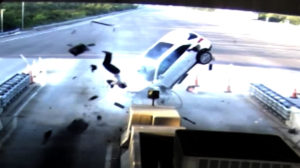
NO SEAT BELT
Flying passenger:
This picture is from a surveillance video showing a drowsy driver crashing his car into a toll booth, ejecting one of his passengers. All five occupants of the vehicle survived the crash.
Car Crash Test With and Without Seat Belt.
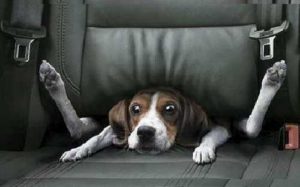
PETS ON-BOARD
Keep your pets in the back of the car and attach them with a pet restraint system,
Do not use a simple leach.
It is not only safer for them in case of an accident but it will prevent them from jumping right to left or in the front seats that could be potentially dangerous.
DO NOT TRANSPORT THEM IN THE BACK OF A PICKUP TRUCK WITHOUT ANY SPECIAL RESTRAINT.

It is illegal to leave a dog or cat unattended in a vehicle during periods of extreme heat or cold.
Law enforcement, firefighters, and other officials may use reasonable force to rescue the animal.
Violations of these laws are misdemeanor offenses.

READY TO GO?

Keep your windshield clean
BEFORE YOU START THE ENGINE
• Adjust the driver’s seat so you can reach and see the controls comfortably.
• Make sure the windshield and windows are clean. Not only does it impair your view, but focusing on spots during long driving is tiring to your eyes.
• Buckle up! And make sure your passengers do too.
• Check your attitude. Are you calm and in control of yourself?
• Check the rear and side mirrors and make sure they are properly adjusted and that the back window is clean.
CONTACT!

Don’t forget your turning signal
- Ensure gear selector is in Park or Neutral.
Turn ignition switch to “on,” check dash lights and instruments (ABS brakes, airbags, fuel level, etc.). - Adjust the volume on your stereo system. Can you hear normal traffic sounds? If not, reduce the volume so you can hear them.
- Start the engine. Check fuel level and warning lights. Make sure the dashboard does not show any malfunction from the engine.
- If needed, turn on headlights, turn signal and windshield wipers.
- Turn on low-beam headlights, even in the daytime. Your vehicle is visible at twice the distance with your headlights on. Many cars have this feature automatic.
- Place your foot on the brake pedal.
- Watch for pedestrians, especially children at play. Head check for blind spots. Look and listen for traffic & bicyclists.
- When all is clear, engage the selector in Drive or Reverse.
- Release the brake and accelerate slowly.
You are on your own!
Steering Methods
Do not let the steering wheel slip through your fingers. The driver should reverse the hand and arm movements made during the turn when coming out of a turn. This “counter-steering” makes for smooth turns and will also help in skids and driving on snow and ice. Most modern driving courses teach students to place their hands at about 9 o’clock and 3 o’clock on the wheel, rather than 10 and 2, due to the airbag at the center of the wheel.
Overall, there are two generally accepted steering methods: Push-Pull and Hand-over-Hand.
In Nevada, it’s recommended to hold the steering wheel with your hands at the 9 and 3 o’clock positions. This placement helps you maintain better control and minimizes the risk of injury if the airbag deploys. While Nevada law doesn’t specify a particular position, keeping both hands on the wheel is crucial for safe driving.
Push-Pull Method
The following method is recommended because it slows down your turning movements, making for a smoother, safer turn. It also keeps both hands on the steering wheel throughout the entire maneuver.
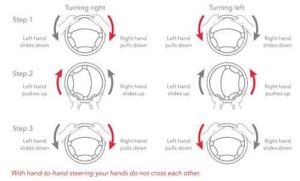
Left Turn
Start with your hands at the proper placement of 8/4 o’clock. Pull down with your left hand to approximately 7 o’clock, and then push up with your right hand until it reaches approximately 1 o’clock. Repeat this pattern until you complete your turn. Counter-steer to straighten out the vehicle.
Right Turn
Start with your hands at the proper placement of 8/4 o’clock. Pull down with your right hand to approximately 5 o’clock then, push up with your left hand until it reaches approximately 11 o’clock. Repeat this pattern until you complete your turn. Counter-steer to straighten out the vehicle.
About Hand Over Hand old method
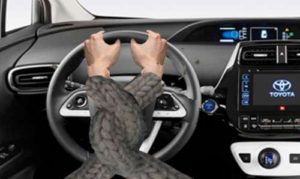
While hand-over-hand steering is the method utilized by most drivers and it looks more efficient than the push-pull method, it is really not and, while it is acceptable to use this driving technique during the driving test, we urge you to try and get accustomed to the hand-to-hand steering method from the start.
The hand-over-hand steering technique involves bringing your arms into the airbag operation area, should an airbag be deployed when you have your arms crossed, you will have them thrown into your face at the speed of 200 mph.
When turning the vehicle with this method, you will need to be careful to keep your speed down. This method allows for quicker wheel movement, but there will be times when you will only have one hand on the wheel. For this reason, we recommend using the push-pull method.
In Nevada you cannot use your hazard light while driving
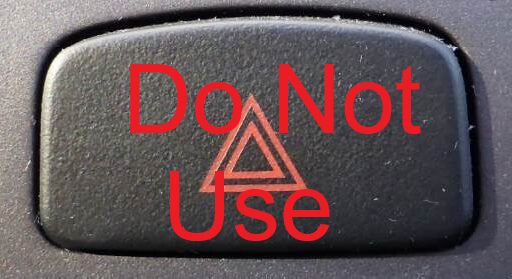
- ” So If I cannot use my hazard Light while driving in Nevada, when can I use it ?
- Can I play with it when listening to hard rock music? Looks cool!!!
Use your hazard lights only when your car is stopped or disabled on the road.
Using your hazard lights while driving is illegal in several states, including Nevada.
* Hazard lights can actually reduce visibility making other drivers think you are stopped or stalled.
* They make it difficult to see if motorists ahead are tapping on the brakes.
* They turn off your ability to use your turn signals.
If you cannot see, pull over to a safe place and wait till driving conditions are better. Your flashers should only be used while your vehicle is stopped or disabled on the roadway or shoulder. This is a sign of emergency services that someone requires assistance.
According to police, if the weather is so bad that you can’t safely see while driving, pull over to a safe place until the storm passes.

Driving is not just knowing how to turn a wheel, but knowledge, awareness, and experience
SORRY FOR THE REPEAT: DESPITE ALL OUR WARNINGS MANY STUDENTS STILL DO THEIR QUIZZES BY GUESSING ANSWERS.
from this lesson 4 All training quizzes require 100 percent good responses for teenagers in order to be allowed to continue.
QUIZZES AND EXAM ARE ONLY THERE FOR YOU TO TEST YOUR KNOWLEDGE and for you to remember and apply in real life what you have learned.
KNOWLEDGE IS THE KEY. GUESSING THE QUIZZES DOES NOT TRAIN YOUR SUBCONSCIOUS MIND. IT CONFUSES IT.
BE A RESPONSIBLE ADULT, you will be soon in charge of a deadly weapon (your car)
Thank you for your understanding.
If you miss 100 percent in your quiz, click on the “review Questions” button to see where you failed and find your answers in the topic’s text. The number of redos is limited to Five (3 times too many) 3 Years ago a student redid the previous 13 question-quiz 32 times. I tried to contact him but he never answered the chat room, his phone, or Emails. 32 times!!! Talk about frustration! He missed his exam 3 times. Please, read the answers you missed in your topics and pass your quizzes the second time, it is the BEST way to remember them.
End of Topic 4 a – READY TO DRIVE
Next Step: TOPIC 4 b: “TRAFFIC SIGNS & MARKINGS”
